As the air turns crisp and leaves begin to show their true colors, there's a particular kind of excitement that starts to bubble up, so. It’s almost as if the very spirit of the season calls for something special, something that really captures the feeling of autumn. We often think of fall in terms of delicious tastes, like the comforting warmth of pumpkin pies or the inviting aroma of pumpkin bread, which, you know, are always a hit. But beyond all those wonderful flavors, there’s another tradition that brings a unique kind of happiness and a chance to get creative with your hands.
This time of year, it just wouldn’t feel complete without pumpkins popping up everywhere, would it? From sweet treats like cake and waffles to savory dishes like pasta and soup, you’ll find plenty of pumpkin in these seasonal moments, so. Yet, there’s something truly special about taking one of these round, orange beauties and turning it into a work of art, a glowing beacon that welcomes the cooler evenings. It’s a chance to step away from the kitchen for a bit and really let your imagination take hold.
The act of shaping a pumpkin, of giving it a face or a scene, is that a way to connect with the season in a very tangible way. It’s a practice that brings people together, offering a chance for families and friends to gather and share in a bit of creative fun. There's a simple pleasure in watching a plain pumpkin transform under your touch, becoming something new and, honestly, quite charming, more or less.
Table of Contents
- What Makes Pumpkin Carving So Special?
- Getting Ready for Your Pumpkin Carving Adventure?
- The Art of Pumpkin Carving - Picking Your Design
- How Do You Keep Your Pumpkin Carving Looking Fresh?
- After the Pumpkin Carving - What Next?
- Are There Different Ways to Approach Pumpkin Carving?
- Pumpkin Carving - Safety First, Always
- Where Can You Find What You Need for Pumpkin Carving?
What Makes Pumpkin Carving So Special?
There's something truly captivating about the tradition of pumpkin carving, isn't there? It’s more than just cutting shapes into a gourd; it’s a moment where art meets autumn, a way to truly embrace the season. When you think about fall, it’s not just about the changing leaves or the cooler air, it’s about a feeling, a certain atmosphere. This activity, honestly, captures that feeling perfectly. It allows for a burst of personal expression, letting you put your own unique stamp on a very old custom.
This practice, you know, brings people together. Families often gather around a kitchen table, each person with their own pumpkin, sharing ideas and tools. It becomes a shared experience, creating memories that last much longer than the pumpkin itself. The laughter, the friendly chatter, the quiet concentration as someone carefully works on an eye or a tooth – these are the moments that make it so special, that, in a way, are the heart of it all. It’s a simple joy, really, but a profound one.
And then there’s the transformation. You start with a plain, round pumpkin, a natural canvas, so. With a bit of thought and some careful cuts, it becomes something entirely different: a spooky face, a friendly grin, or a detailed scene. This act of creation, of turning something ordinary into something extraordinary, is truly satisfying. It’s a chance to see your ideas come to life, glowing in the fading light of an autumn evening, which is that pretty cool.
Getting Ready for Your Pumpkin Carving Adventure?
Before you can begin the fun of pumpkin carving, there are a few things to consider, naturally. First, you need to pick the right pumpkin. Look for one that feels firm and has a good, even shape. A flat bottom is helpful, as it will sit steadily on your work surface. Think about the size too; a larger pumpkin gives you more space for a detailed design, while a smaller one might be just right for a quick, charming face, more or less.
Once you have your chosen pumpkin, the next step is to prepare it. This usually means carefully cutting a lid from the top, perhaps around the stem, or even from the bottom for a cleaner look. Then comes the scooping, which is that part where you reach inside and remove all the stringy bits and seeds. This can be a bit messy, but it’s a necessary step. As a matter of fact, don't throw those seeds away! Remember those salty, crunchy snack recipes? You can clean them up, roast them, and have a delicious seasonal treat.
And the pulp you scoop out? That, too, has a purpose. From pumpkin pies and pumpkin bread to savory pumpkin soup and pasta, we've got hundreds of recipes to help you make use of one of fall's favorite flavors, so. Homemade pumpkin puree is easier to make than you think, and that can be used in so many dishes, like that cult-favorite cheesecake factory pumpkin cheesecake. So, while you're getting ready for pumpkin carving, you're also setting yourself up for some amazing fall cooking, which is pretty neat.
The Art of Pumpkin Carving - Picking Your Design
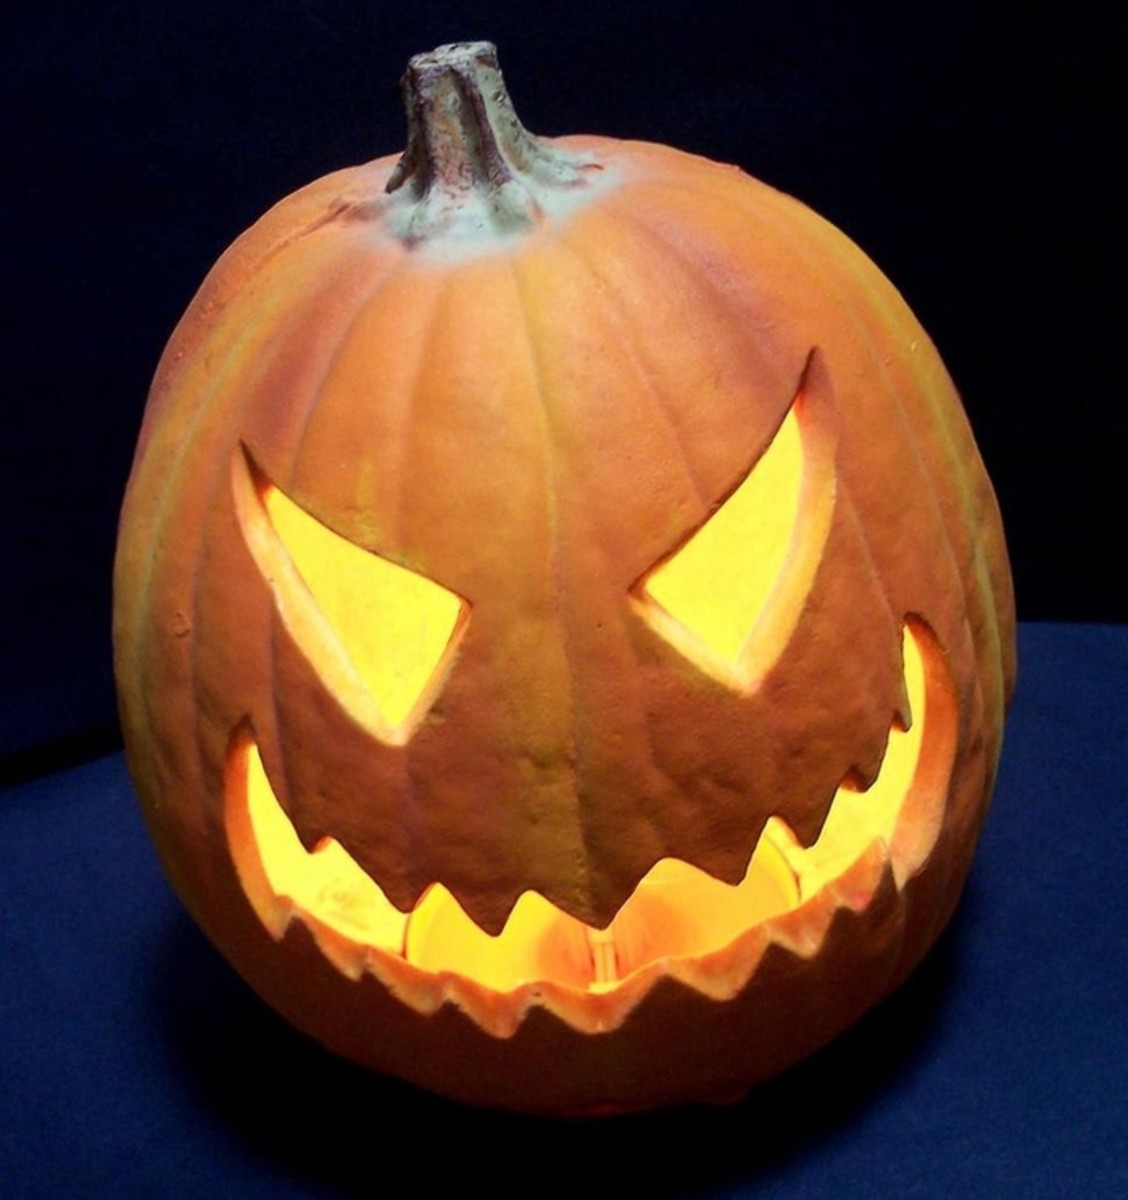
Choosing what to carve into your pumpkin is, arguably, one of the most exciting parts of the whole pumpkin carving process. Do you want something simple and classic, like a traditional spooky face with triangular eyes and a jagged mouth? Or are you feeling a bit more ambitious, ready to try a more intricate scene or a character from a story? The possibilities, honestly, are nearly endless. You could even go for something abstract, just playing with shapes and light.
Some people like to sketch their design directly onto the pumpkin with a marker that washes off, just a little. This gives them a guide to follow as they cut. Others prefer to use stencils, which are readily available and can help you create very precise images, like your favorite spooky creature or a friendly animal. Stencils are a great way to get started, especially if you’re new to pumpkin carving or if you want a particular look, so.
Then there are those who prefer to freehand it, letting their creativity flow as they go. This approach can lead to truly unique and unexpected results, as a matter of fact. No matter your chosen method, the idea is to have fun with it. The design you pick really makes your pumpkin carving your own, giving it a distinct personality that will greet everyone who sees it, which is kind of the point.
How Do You Keep Your Pumpkin Carving Looking Fresh?
After spending time and effort on your pumpkin carving, you naturally want it to last as long as possible, right? Pumpkins are organic, so they will eventually start to soften and, you know, not look their best. However, there are some simple steps you can take to help keep your creation looking good for a bit longer. These methods aim to slow down the natural process of decay, allowing you more time to enjoy your work.
One common trick is to give your carved pumpkin a bath. After you’ve finished all your cutting, you can actually submerge the entire pumpkin in a tub of cool water for a few hours, perhaps overnight. This helps it soak up some moisture, which can make the pumpkin flesh firmer and less likely to dry out quickly. Some people even add a tiny bit of bleach to the water, which apparently helps to prevent mold growth, so.
Another idea is to rub a thin layer of petroleum jelly or vegetable oil on all the cut edges, and even inside the pumpkin. This creates a barrier that helps to seal in moisture and keeps the air from drying out the exposed flesh. It’s a pretty simple step, but it can make a noticeable difference in how long your pumpkin carving maintains its fresh appearance, which is really what you want.
After the Pumpkin Carving - What Next?
Once your pumpkin carving is complete, the next exciting step is to display it, obviously. Where you place your pumpkin can really change how it looks and feels. Many people put their pumpkins on a porch or near a front door, welcoming visitors with a festive glow. Others might place them inside, perhaps on a table or near a window, to enjoy the light from within, so.
For lighting, traditional candles are a classic choice, offering a warm, flickering glow that truly brings the pumpkin to life. However, if you're concerned about safety, especially with children or pets around, battery-operated LED lights are a fantastic alternative. They offer a steady, bright light without any heat or flame, which is a lot safer, really. You can find these in various colors and even flickering versions to mimic a real candle.
Beyond just lighting it up, think about how your pumpkin carving fits into your overall fall decor. Maybe it’s part of a larger display with hay bales, cornstalks, or other seasonal items. The goal is to create a welcoming and festive atmosphere, making the most of your creative efforts. It’s all about enjoying the beauty of the season and sharing that joy with others, you know, which is kind of the whole point.
Are There Different Ways to Approach Pumpkin Carving?
While the classic method of cutting all the way through the pumpkin is popular, there are actually many different ways to approach pumpkin carving, as a matter of fact. These varied techniques allow for a wider range of designs and effects, letting you get even more creative with your seasonal display. It’s not just about making holes; it’s about playing with light and shadow in interesting ways, too.
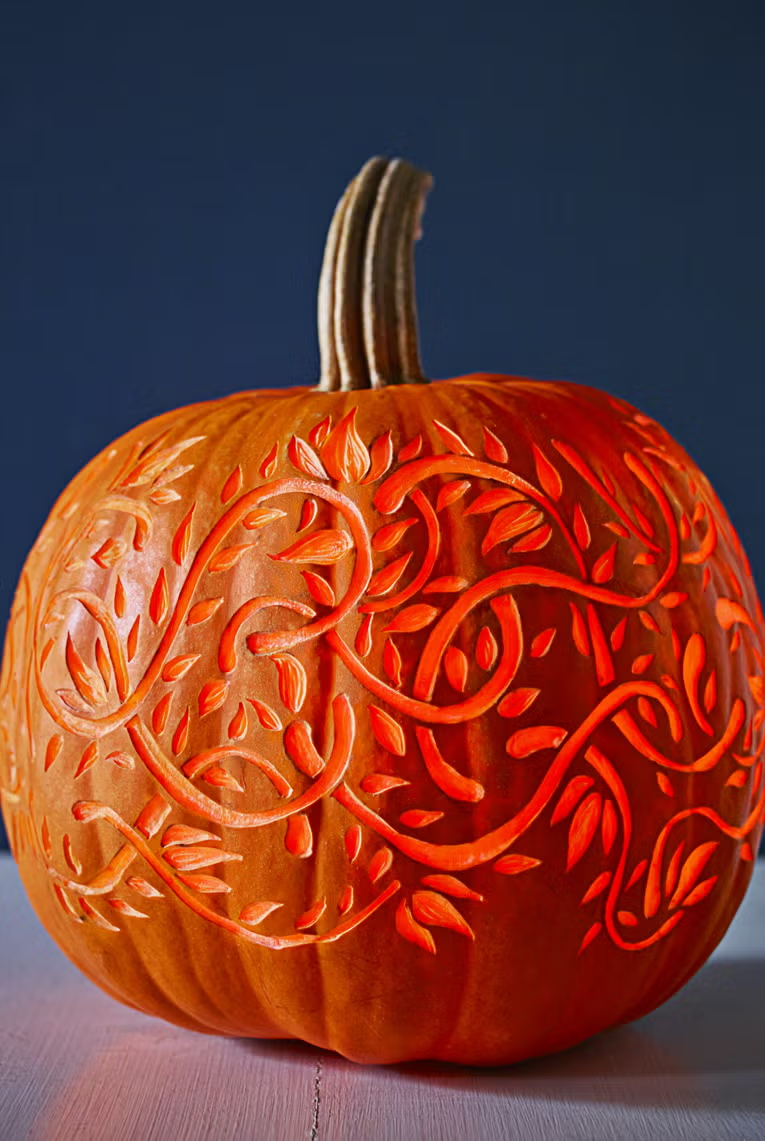
One technique is called "shaving" or "etching." Instead of cutting completely through the pumpkin wall, you just scrape away the outer layer of skin, exposing the lighter flesh underneath. This creates areas that glow softly when lit from within, rather than shining brightly. You can use this method to add texture, shading, or fine details that would be too difficult to achieve with full cuts, which is pretty cool.
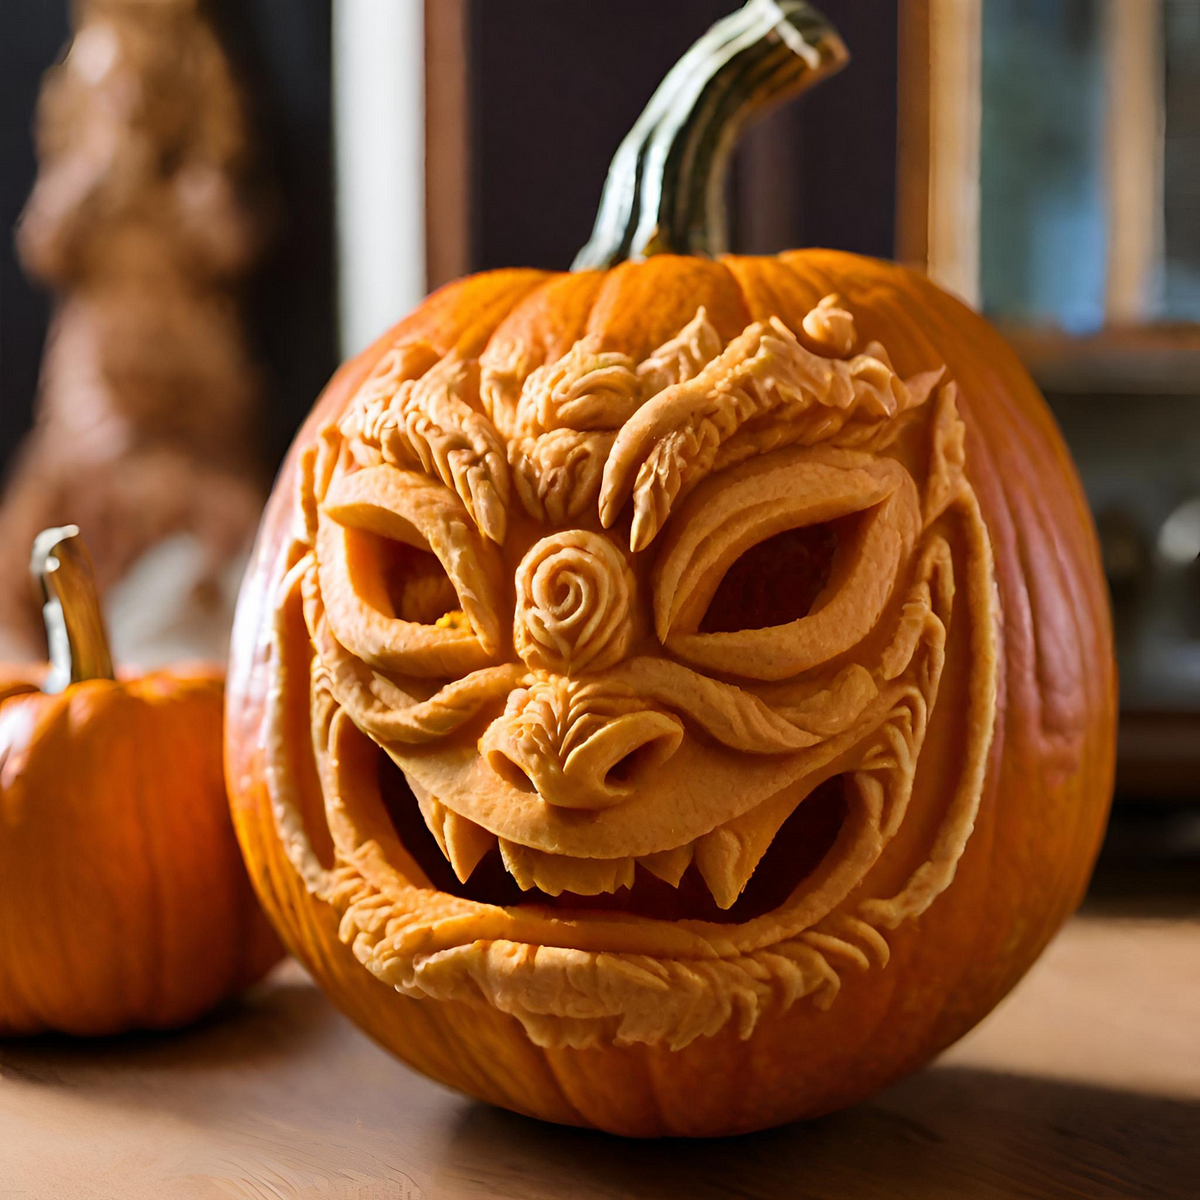
Another approach is to use different kinds of tools. While many people use simple kitchen knives or basic carving kits, more experienced carvers might use specialized tools, like those found in wood carving sets, to create extremely detailed and intricate designs. Some even use power tools for larger projects, though that requires a bit more skill and, honestly, a lot more caution, you know.
Pumpkin Carving - Safety First, Always
No matter how excited you are to start your pumpkin carving, safety should always be your top concern, absolutely. Working with sharp objects, especially when dealing with a round, sometimes slippery surface, requires a good deal of care. Taking a few simple precautions can help prevent accidents and ensure that your carving experience is fun for everyone involved, so.
Always make sure you’re working on a clean, stable surface that won't move around. It's a good idea to use a cutting board or a thick layer of newspaper to protect your table. When holding the pumpkin, keep your free hand away from the path of the cutting tool. If you’re using a knife, always cut away from yourself, never towards your body, which is just common sense, really.
For younger carvers, it’s best to use specialized pumpkin carving tools designed for children, which are typically safer and less sharp. Better yet, have an adult handle all the cutting, and let the kids do the scooping and design drawing. Supervising children closely during any pumpkin carving activity is, honestly, quite important. Remember, the goal is to have a good time and create something wonderful, not to end up with a cut finger, as a matter of fact.
Where Can You Find What You Need for Pumpkin Carving?
Getting ready for your pumpkin carving adventure often means gathering a few supplies, naturally. While the pumpkin itself is the star, having the right tools and accessories can make the whole process smoother and more enjoyable. You don't need anything overly complex, but a few key items can really help your creative vision come to life, so.
Many general stores and seasonal shops will have basic pumpkin carving kits available during the autumn months. These kits usually include a small saw-like tool, a scooper, and perhaps some stencils. For more specialized tools, you might look at places that offer items for home projects or crafts, which often have a wider selection of implements for various creative pursuits, more or less.
Beyond the tools, think about what else might be helpful. A large bowl for the pumpkin guts, paper towels for cleanup, and a good light source for when you’re working on details are all useful. And don't forget the light for inside your finished pumpkin! Whether it’s a traditional candle or a battery-operated LED, having it ready means you can immediately enjoy your completed pumpkin carving, which is pretty satisfying.
Related Resources:
Detail Author:
- Name : Libbie Morar
- Username : ethyl.lindgren
- Email : shields.royal@gmail.com
- Birthdate : 1971-12-25
- Address : 8701 Alfonzo Roads North Dimitri, MA 41787-4064
- Phone : (215) 539-5089
- Company : Lind-Kunze
- Job : Funeral Attendant
- Bio : Nobis cum veniam et molestias eos. Provident temporibus et tempore. Inventore quo illo quod ut.
Socials
facebook:
- url : https://facebook.com/jedmarvin
- username : jedmarvin
- bio : A et ex inventore rerum. Est suscipit ab voluptatem veniam saepe perferendis.
- followers : 5344
- following : 2010
twitter:
- url : https://twitter.com/jmarvin
- username : jmarvin
- bio : Et iste ullam non iure assumenda voluptas amet. Officia dolor ducimus culpa dolores. Veniam nobis deleniti ex ut et deserunt.
- followers : 4488
- following : 1506
tiktok:
- url : https://tiktok.com/@jed.marvin
- username : jed.marvin
- bio : Dolorem nulla rerum qui est dicta enim. Voluptas qui sunt ea adipisci delectus.
- followers : 4342
- following : 459
