Ever looked at a plain surface and wished it had the warm, inviting look of natural wood grain? It's a common feeling, and actually, there's a pretty neat trick for that. A graining tool can help you bring that rich, textured appearance to all sorts of things, from furniture to walls, without needing to buy actual wood. It's a way to give things a whole new feel, creating a look that's quite convincing and adds a lot of character to a space, so it's almost like magic.
This kind of tool lets you put a wood pattern onto something that isn't wood at all. Think about how a piece of wood has those lines and swirls, the grain that makes it unique. A graining tool lets you draw those lines and swirls onto a painted surface, making it appear as if it truly has that natural wood texture. It is that simple, in a way, to change how a surface looks, making it much more interesting than it was before.
You can find these helpful items at places like Home Depot, which is a spot many people go for home improvement things. Knowing a bit about what these tools do, and how they work, can really open up some creative possibilities for your home or for different projects you might be working on. It's a pretty useful thing to have in your collection of tools, especially if you enjoy giving things a fresh look.
Table of Contents
- What is a Graining Tool and What Does It Do?
- Types of Graining Tools at Home Depot
- How to Pick the Right Graining Tool at Home Depot?
- Getting Ready to Use Your Graining Tool from Home Depot
- Using Your Graining Tool from Home Depot for Best Results
- What are Common Mistakes with a Graining Tool from Home Depot?
- Taking Care of Your Graining Tool from Home Depot
- Projects You Can Do with a Graining Tool from Home Depot
What is a Graining Tool and What Does It Do?
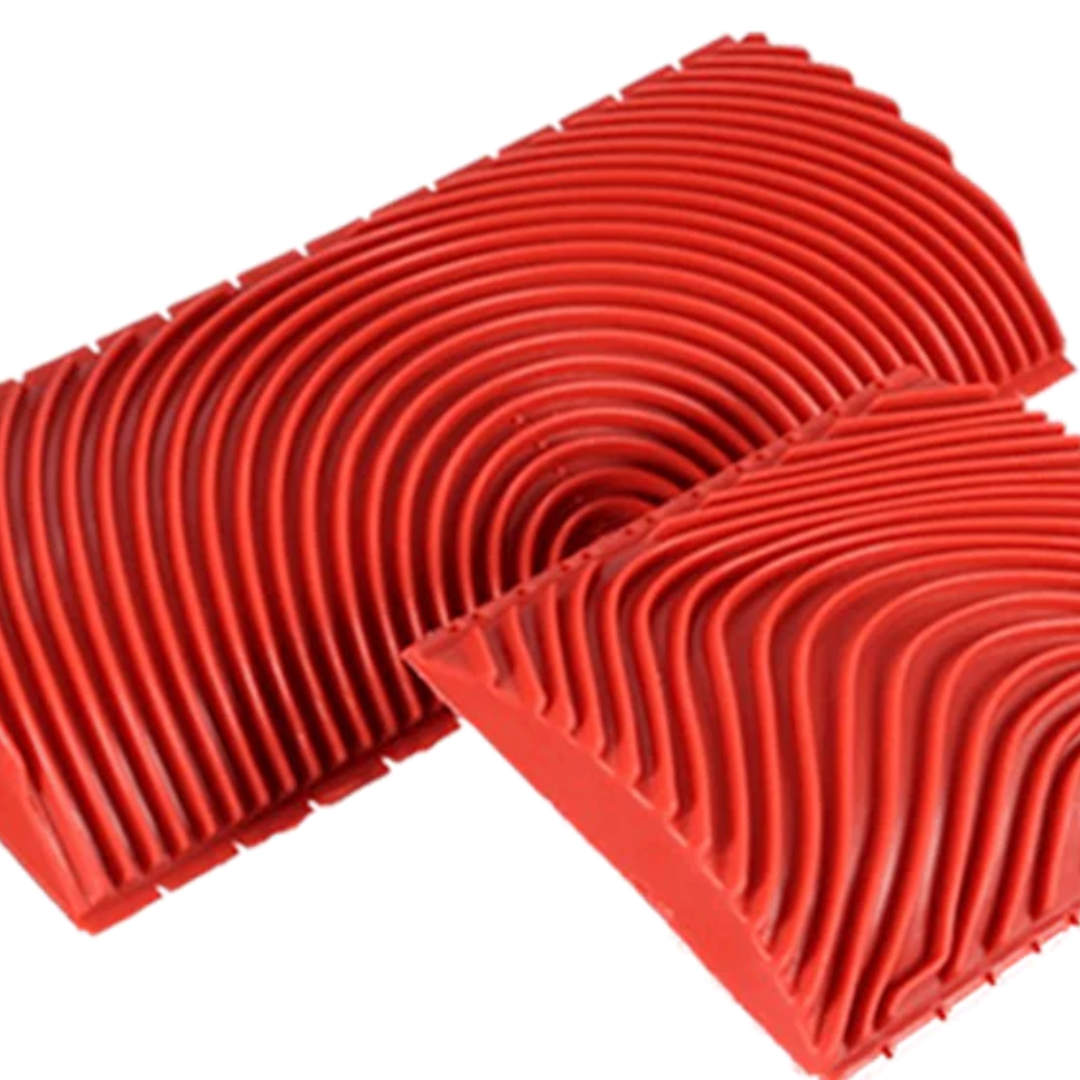
A graining tool, to put it simply, is a special kind of brush or pad that helps you put a fake wood pattern onto a surface. It's usually made of rubber, with a wavy or textured edge that looks a lot like real wood grain. When you drag it through wet paint, it leaves behind a pattern that really does resemble the natural lines you see in wood. It's a way to get the look of wood without actually using wood, which can be quite helpful for many different projects, you know.
The main idea behind using one of these tools is to give plain surfaces, like metal doors, laminate cabinets, or even just a painted wall, the warm and inviting feel of natural timber. It can turn something that looks a bit dull or too uniform into something with depth and visual interest. People often use them when they want to update an old piece of furniture without spending a lot of money on new wood, or when they want to match a new item to existing wooden things in a room. It's pretty versatile, actually, for creating a cohesive look.
So, you paint your item with a base color, usually something light like a cream or a pale tan. Then, you put a darker color, often a brown or a reddish-brown, on top of that. While that second layer of paint is still wet, you take your graining tool and pull it across the surface. The tool picks up some of the wet top paint, leaving the lighter base color showing through in a pattern that looks just like wood grain. It's a process that needs a little practice, but it's not too hard to get the hang of, and the results can be really pleasing, you know, when it's done well.
Types of Graining Tools at Home Depot
When you head over to a place like Home Depot looking for a graining tool, you'll find there are a few different kinds, each designed to make a slightly different wood pattern. Knowing what each one does can help you pick the right one for your project. There are the classic rocker tools, which are probably what most people think of first when they hear "graining tool." These are usually a piece of rubber with a handle, and they have a curved edge that you rock back and forth as you pull it to create a wavy grain pattern. They're good for making broader, more flowing wood lines, in a way, like those you might see on a big piece of lumber.
Then, you have the comb-style graining tools. These look a bit like a comb, with different sized teeth or ridges. You drag these straight across the wet paint to make finer, straighter lines, kind of like the tighter grain you see in some types of wood. Some sets even come with interchangeable combs, so you can switch out the patterns to get different looks, from very fine lines to wider, more open ones. These are really useful for making things look like they have a very tight, straight grain, which can be quite specific for certain types of wood appearances, too it's almost like drawing with paint.
You might also find specialty graining tools, which are less common but can create unique effects. These could be small rollers with a textured surface, or even stamps that you press onto the paint to create knots or other specific wood features. While the rocker and comb tools give you the main grain, these specialty items can add those little details that make the fake wood look even more real. It's about adding those imperfections that make wood beautiful, you know. Home Depot usually has a good selection of these basic types, so you can usually find what you need to start your graining project there.
How to Pick the Right Graining Tool at Home Depot?
Choosing the right graining tool from Home Depot can feel a bit like picking out the right paintbrush, you know, there are options. The first thing to think about is the kind of wood look you're going for. Do you want something with big, sweeping grain lines, or do you prefer a tighter, more uniform pattern? If you're after those big, flowing lines, a rocker-style graining tool is probably your best bet. It's designed to create those wider, more natural-looking swirls that many people associate with wood. On the other hand, if you need something that looks like a very straight, fine grain, a comb tool with its distinct teeth will be much better suited for that particular job, basically.
Consider the size of the surface you'll be working on. If you're doing a small project, like a picture frame or a small cabinet door, a smaller graining tool might be easier to handle and control. For bigger areas, like a whole wall or a large piece of furniture, a wider graining tool will help you cover more ground quickly and create a more consistent pattern without too many breaks. It's about matching the tool's size to the scale of your work, which makes a lot of sense, really, for getting a good finish.
Also, think about your own comfort and how easy the tool feels in your hand. Some graining tools have ergonomic handles that are more comfortable to grip for longer periods. If you're new to graining, a tool that feels good to hold and is easy to maneuver will make the learning process much smoother. You might even want to look for a set that includes a few different types of graining tools, as this can give you more flexibility and allow you to experiment with various patterns. It's a good idea to just hold a few in the store and see what feels right for you, in a way, before you make a choice.
Getting Ready to Use Your Graining Tool from Home Depot
Before you even pick up your graining tool from Home Depot and start painting, there are a few important steps to take to make sure your project goes smoothly. First, you need to prepare the surface you're going to work on. This means making sure it's clean, dry, and smooth. If there are any bumps, old paint flakes, or dirt, these will show through your new grain pattern and won't look very good. So, you might need to sand it down a little, wipe it clean, and let it dry completely. This initial step is pretty important for a nice finish, you know.
Next, you'll apply your base coat of paint. This is the color that will show through as the "grain" of your fake wood. Usually, this is a lighter color, like a cream, a light tan, or even a pale yellow, depending on the kind of wood you want to imitate. Make sure this base coat is fully dry before you move on. If it's still wet, your graining paint might mix with it, and you won't get a clear pattern. It's worth taking your time here, actually, to let it cure properly.
Then comes the graining paint itself. This is typically a darker color, like a rich brown, a deep red, or even a dark gray, again, depending on your desired wood look. You'll apply this second coat over your dry base coat. The trick here is to work in small sections because you need to use your graining tool while this top coat is still wet. If it dries, the tool won't be able to create the pattern. So, have everything ready to go before you start applying this second layer, that is really key to success.
Using Your Graining Tool from Home Depot for Best Results
Once your surface is ready and you've applied your wet graining paint, it's time to actually use your graining tool from Home Depot. The key to good results is a steady hand and consistent pressure. Start at one end of your painted section and gently drag the graining tool across the wet paint in a single, continuous motion. Try not to stop or lift the tool in the middle of a stroke, as this can create noticeable lines where you paused. It's about making a smooth, unbroken movement, you know, like drawing a long line.
For a rocker-style graining tool, as you pull it, you'll gently rock it back and forth to create those wavy, natural-looking grain patterns. The amount you rock it will change the look of the grain. A little rock makes a tighter pattern, while more rocking creates wider, more open swirls. With a comb-style tool, you simply pull it straight, letting the teeth create the fine lines. You can also slightly wiggle it from side to side as you pull to give a bit more variation to the lines, making it look a little more organic, you know, rather than perfectly straight.
After each stroke, wipe your graining tool clean with a damp cloth or paper towel. This prevents dried paint from building up on the tool, which can mess up your next pattern. Also, try to overlap your strokes slightly, but not too much, to create a continuous wood grain effect across your surface. It's a bit like drawing, where each line connects to the next. Practice on a scrap piece of cardboard or wood first to get a feel for the tool and the amount of paint you need. This will help you feel more confident when you start on your actual project, which is really helpful, by the way.
What are Common Mistakes with a Graining Tool from Home Depot?
Even though using a graining tool from Home Depot seems pretty straightforward, there are some common slip-ups that people often make. Knowing about these can help you avoid them and get a better outcome for your project. One of the biggest mistakes is applying too much or too little graining paint. If you put on too much, the tool won't be able to pick up enough paint to create a clear pattern, and you'll just end up with a messy, thick coat. If you put on too little, the pattern might be too faint or patchy. It's about finding that sweet spot, which usually takes a little practice, you know, to get it just right.
Another frequent error is letting the graining paint dry too much before using the tool. Remember, the tool works by dragging through wet paint. If the paint starts to skin over or dry, the tool will just scratch the surface or create a very rough, uneven pattern. This is why it's so important to work in small sections and to move quickly once the graining paint is on. It's a race against the clock, in a way, to get the pattern done before the paint sets.
People also sometimes forget to clean their graining tool between strokes. Paint can build up on the rubber, and then it transfers back onto your surface, creating blobs or smudges instead of a clean grain pattern. A quick wipe after each pass makes a big difference. Also, trying to do too much at once, like trying to grain a whole large door without breaking it into manageable sections, can lead to uneven results because the paint will start drying in some areas while you're still working on others. Taking your time and working methodically is pretty important, honestly, for a good finish.
Taking Care of Your Graining Tool from Home Depot
Just like any other tool you buy from Home Depot, taking good care of your graining tool will make sure it lasts a long time and works well every time you use it. The most important thing is to clean it thoroughly right after you're done with your project. If you let paint dry on the rubber, it can harden and become very difficult to remove. This dried paint can also change the shape of the tool's pattern, making it less effective for future projects. So, as soon as you finish, give it a good wash. It's a simple step that makes a big difference, you know.
For water-based paints, a little warm water and some mild soap are usually all you need. Gently scrub away any paint residue, making sure to get into all the grooves and textures of the rubber. For oil-based paints, you might need a paint thinner or mineral spirits, following the product's safety instructions. Make sure to rinse it well afterward to remove any cleaning solution. It's about getting all the gunk off, basically, so it's ready for next time.
After cleaning, let your graining tool air dry completely before putting it away. Storing it while it's still damp can lead to mildew or damage to the rubber over time. Once it's dry, store it in a place where it won't get bent or squished, as this could warp the rubber and affect its ability to create a consistent pattern. A drawer or a toolbox where it has its own space is ideal. Proper care means your graining tool will be ready for your next creative idea, which is pretty convenient, if you think about it.
Projects You Can Do with a Graining Tool from Home Depot
Having a graining tool from Home Depot opens up a whole world of project possibilities around your home. One of the most popular uses is to give plain, flat doors the look of a solid wood door. This can completely change the feel of a room without the expense of replacing the doors themselves. You can transform interior doors, closet doors, or even the front of a plain metal exterior door, making it look like a rich, wooden entrance. It's a really effective way to update things, you know, on a budget.
Another common project involves cabinets. If you have old laminate cabinets that look a bit dated, or plain painted ones that lack character, a graining tool can give them a fresh, wooden appearance. This works great in kitchens, bathrooms, or even on built-in shelving. You can match the "wood" grain to other wooden elements in your home, creating a more unified look. It's a way to refresh things without a big renovation, which is quite appealing, by the way.
Beyond doors and cabinets, you can use a graining tool on furniture. An old dresser, a plain coffee table, or even a simple bookshelf can be given a new lease on life with a convincing wood grain finish. This is a fantastic way to upcycle items and give them a custom, high-end look. You can also use it on smaller decorative items, like picture frames, plant stands, or even plain storage boxes, to add a touch of rustic charm or classic elegance. The possibilities are pretty wide open, actually, for adding that wood look to various items around the house.
Finally, some people even use graining tools to create accent walls. Instead of using wallpaper or real wood panels, you can paint a wall and then use the graining tool to give it the appearance of a wooden feature wall. This can add warmth and texture to a room, making it feel more cozy and inviting. It's a creative way to bring the beauty of wood into your living space without the heavy lifting or cost of actual timber, so it's almost like painting a picture of wood on your wall.
This article has gone over what a graining tool is and what it does, the different types you might find at Home Depot, how to choose the right one, and how to get ready to use it. We also talked about the best ways to use your graining tool for good results, common errors to steer clear of, how to take care of your tool, and some of the many projects you can tackle with a graining tool from Home Depot.
Related Resources:


Detail Author:
- Name : Prof. Josianne Walsh V
- Username : lula.altenwerth
- Email : ricardo60@gaylord.org
- Birthdate : 1985-03-09
- Address : 29509 Dashawn Points Kasandrafort, NH 10696
- Phone : (312) 287-5660
- Company : Roob PLC
- Job : Septic Tank Servicer
- Bio : Esse vitae doloribus eum est. Delectus rerum dolorum reiciendis temporibus repellat perferendis. Culpa consequatur est autem nulla tenetur nihil. Doloremque maxime corporis dolor.
Socials
instagram:
- url : https://instagram.com/reyna5530
- username : reyna5530
- bio : Non quaerat optio quia magnam repellendus dolorum. Repellendus hic beatae aut facere illo modi.
- followers : 5474
- following : 526
twitter:
- url : https://twitter.com/reyna.stamm
- username : reyna.stamm
- bio : Qui reiciendis voluptatum hic ullam pariatur. Soluta error quibusdam itaque provident aut sunt aliquam sit. Vel mollitia quisquam rerum dolorum.
- followers : 263
- following : 2405
